How to Apply Maybelline Gel Nail Polish: The Ultimate 2026 DIY Guide
You don't need a bulky UV lamp or a pricey salon appointment to get a high-shine, chip-resistant manicure that lasts all week. We've all been there; you spend forty minutes carefully painting your nails only to have them chip while you're reaching for your keys. It's incredibly frustrating when your long-wear polish streaks or takes an eternity to dry. Learning how to apply maybelline gel nail polish correctly is the ultimate secret to skipping those high salon fees without sacrificing that professional, glossy glow.
We've mastered the specific thin-to-thick layering technique using Maybelline's iconic formulas to help you achieve a rock-solid finish every time. You deserve a high-quality routine that actually fits into your busy schedule without the intimidation of high-end boutique prices. We will walk through the exact steps to prep your nails, apply the Super Stay Forever Strong 7 Days Gel Nail Polish, and lock in a professional look for a fraction of the price. Get ready to discover your new favorite DIY beauty hack and turn your home into a vibrant marketplace of style.
Key Takeaways
- Learn the difference between Fast Gel and Super Stay formulas to choose the perfect hybrid technology for your busy schedule.
- Master the professional "three-stroke" method to discover exactly how to apply maybelline gel nail polish for a streak-free finish.
- Discover the "Top Coat Refresh" secret that extends your high-shine manicure and prevents chipping past the four-day mark.
- Understand how daily cuticle oil application keeps your long-wear polish flexible and prevents unsightly cracking.
- Achieve salon-quality results at home using the Maybelline Super Stay Forever Strong 7 Days Gel Nail Polish Set without needing a UV lamp.
Understanding the Maybelline Makeup Gel Formula: Fast Gel vs. Super Stay
Maybelline has revolutionized the home manicure with its "gel-effect" technology. These are hybrid formulas designed to mimic the high-shine, plumped look of a professional salon service without the need for a UV lamp. While the history of nail polish dates back thousands of years, these modern air-dry polymers represent a massive leap in accessibility. They provide a hardened finish that resists daily wear while remaining easy to remove at home.
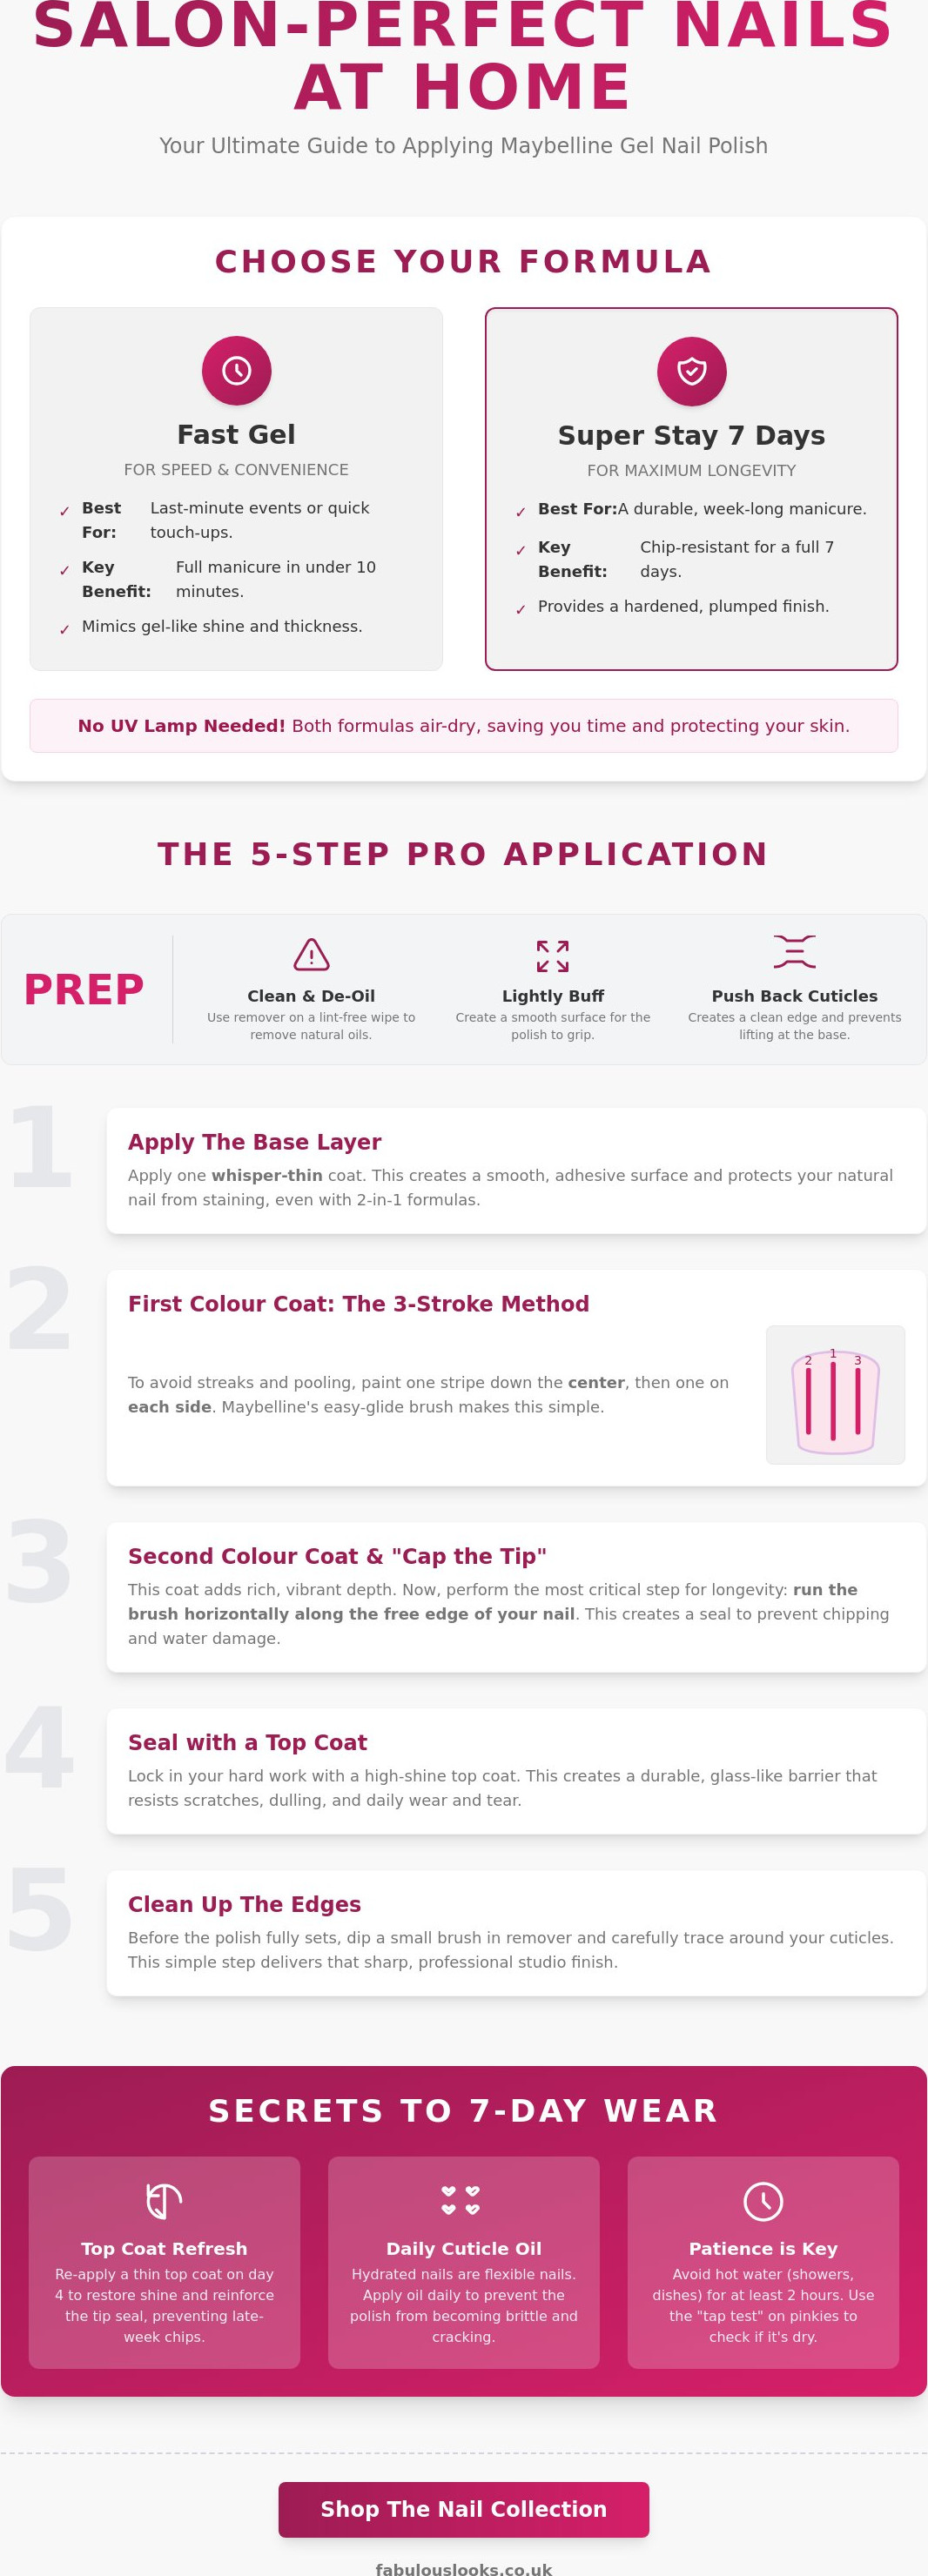
If you're in a rush, the Fast Gel range is your best friend. It's engineered for a full manicure in under 10 minutes, making it perfect for a last-minute event. For those seeking maximum longevity, the Super Stay 7 Days line is the heavy hitter. It focuses on chip resistance and keeping that "just-painted" look for a full week. Both lines offer the "No Lamp Needed" benefit. They dry naturally in the air. This saves you time and avoids the skin-aging rays of UV curing lamps while still delivering that iconic gel-like thickness and shine.
Why Maybelline Makeup is a High-Street Favourite
Maybelline remains a top pick because it balances professional results with incredible value. The standout feature is the "easy-glide" brush. Its wide, curved shape covers the nail in one smooth stroke. This prevents the patchy application common with cheaper, thinner brushes. It's a savvy way to get a luxury look without the boutique price tag. Explore our curated nail collection to find trending shades like those found in the Super Stay Forever Strong 7 Days Gel Nail Polish sets.
The Essential Prep: Creating a Clean Canvas
Prep is everything. Success starts before the first drop of color hits your hand. If you want to master how to apply maybelline gel nail polish, you must start with a clean, oil-free surface. Natural oils are the primary cause of premature chipping. Use a lint-free wipe with a bit of remover even if you aren't wearing old polish. Lightly buff the nail surface to create a tiny bit of texture for the polish to grip onto. Finally, gently push back your cuticles. This simple step creates a clean professional edge and prevents the polish from lifting at the base.
The 5-Step Guide: How to Apply Maybelline Gel Nail Polish Like a Pro
Mastering how to apply maybelline gel nail polish requires more than just a steady hand; it's about the sequence. Follow these five steps to ensure your DIY manicure looks like it came straight from a high-end studio. Start with a thin base layer. Even with 2-in-1 formulas, a dedicated base coat provides an extra shield for your natural nails. This practice aligns with general nail product safety regulations that emphasize protecting the nail plate from staining and external damage.
- Step 1: The Base Layer – Apply a whisper-thin coat to create a smooth, adhesive surface.
- Step 2: The First Colour Coat – Use the "three-stroke" method. Paint one stripe down the center and one on each side to avoid streaks or messy pooling at the cuticles.
- Step 3: The Second Colour Coat – This layer adds rich depth and vibrancy. It's also the perfect moment to "cap" the free edge.
- Step 4: The Fast Gel Top Coat – Seal your hard work with a high-shine top coat. This creates a glass-like barrier that resists scratches and dulling.
- Step 5: The Clean-Up – Use a small brush dipped in remover to tidy up any slips before the polish fully sets.
If you want to build your kit with professional-grade tools, you can find everything you need in our curated nail collection.
Mastering the 'Cap the Tip' Technique
To stop your polish from lifting, run your brush horizontally along the very front edge of your nail. Capping is the essential step for 7-day wear. This technique creates a physical seal that prevents water and oils from getting under the polish. It also helps combat "shrinkage," which often happens as the solvents evaporate and the polish hardens. Keep your layers thin to ensure the capped edge doesn't look bulky.
Drying Times and Patience
Don't ruin a perfect set by rushing the finish. Use the "tap test" to check your progress; gently touch your pinky nails together. If they feel slightly tacky but don't stick, you're almost there. Avoid hot water, including showers or dishwashing, for at least two hours after application. Heat can soften the polish before it's fully cured. For more inspiration on different finishes, check out our guide on Maybelline Show Nail Polish.
Longevity Secrets and Professional Removal Tips
Once you've perfected how to apply maybelline gel nail polish, you want that gorgeous finish to stay put. The secret isn't just in the application; it's in the daily care. Use a high-quality cuticle oil every single morning. This keeps the polish flexible. When polish becomes too dry, it loses its grip and begins to crack. A quick drop of oil ensures your manicure moves with your natural nail rather than snapping against it. It's a simple habit that makes a massive difference in your weekly routine.
Try the "Top Coat Refresh" on day four. Simply apply a fresh, thin layer of clear top coat to revive that high-street shine instantly. This adds a new protective barrier against scratches and daily wear. When it's finally time for a change, prioritize your nail health. Use an acetone-based remover but avoid the urge to peel or scrape the color. Soak a cotton pad, hold it against the nail for thirty seconds, and wipe the color away cleanly. You can find luxury removers and nourishing treatments in our sale-off section to keep your nails in peak condition for your next look.
Common Mistakes That Ruin Your Manicure
- Thick Layers: Applying coats too thickly is the primary cause of unsightly bubbles and peeling. Keep them thin.
- Shaking the Bottle: Never shake your polish bottle. This traps air inside the formula. Roll the bottle between your palms instead to mix the pigments perfectly.
- Skipping the Prep: Forgetting to clean your nails with alcohol or remover before you start is a major error. Any leftover oil will cause the polish to lift within hours.
Building Your Professional At-Home Kit
Maybelline is a staple for anyone wanting professional results on a high-street budget. It's the perfect brand for building a versatile collection that stays on-trend without the intimidation of luxury price tags. To see how it stacks up against other industry leaders, read our Top Makeup Brands 2026 roundup. Ready to start your next manicure? Shop the full Maybelline range at Fabulous Looks and grab your favorite shades today to experience accessible glamour at its best.
Unlock Your High-Shine Manicure Today
You've officially unlocked the secrets to a perfect, chip-resistant manicure. From choosing between Fast Gel and Super Stay to mastering the "three-stroke" method, you now know exactly how to apply maybelline gel nail polish for professional results. Don't forget the importance of capping those tips and keeping your cuticles hydrated. These small steps ensure your vibrant look stays flawless for the full seven days. It's all about using the right technique and a little bit of patience to get that salon-quality finish.
Ready to build your ultimate DIY beauty kit? We provide 100% Genuine Branded Cosmetics at competitive high-street prices. This means you get premium results without the intimidating luxury markup found in boutique shops. Take advantage of our UK-based fast delivery to get your favorite shades delivered straight to your door. Discover the full Maybelline Nail Collection for salon-quality results at home!
Your nails are your best accessory and a canvas for your personal style. Embrace the joy of accessible glamour and enjoy the confidence that comes with a flawless, high-shine finish. We can't wait to see your stunning results!
Frequently Asked Questions
Do I need a UV or LED lamp for Maybelline Fast Gel nail polish?
No, you don't need a UV or LED lamp for Maybelline Fast Gel nail polish. This hybrid formula is designed to air-dry to a high-shine finish without specialized equipment. It's perfect for a quick manicure on the go. You get the look of a salon gel without the skin-aging rays or the extra expense of a curing lamp. Understanding how to apply maybelline gel nail polish properly means enjoying a lamp-free finish every time.
How long does Maybelline Super Stay 7 Days polish actually last?
Maybelline Super Stay 7 Days polish is formulated to last for a full week when you follow the correct application steps. Its iron-enriched formula strengthens the nail while providing a flexible, chip-resistant shield. To ensure you hit that seven-day mark, remember to cap the free edge and avoid soaking your hands in hot water immediately after painting. Proper prep is the absolute key to achieving this longevity.
Can I use a different brand's top coat with Maybelline gel polish?
You can use a different brand's top coat, but staying within the Maybelline family usually gives the best results. The chemical formulas in the Super Stay or Fast Gel lines are specifically balanced to bond with their own top coats. Mixing brands might lead to slower drying times or unexpected peeling. If you want that perfect glass-like finish, sticking to the matching Maybelline top coat ensures maximum compatibility and shine.
How do I stop my Maybelline gel polish from bubbling during application?
Bubbling usually happens when air gets trapped in the polish. To prevent this, never shake the bottle; roll it between your palms instead. Apply very thin layers. Thick coats trap solvents underneath, which then try to escape as gas, creating those annoying little bumps. Knowing how to apply maybelline gel nail polish in thin, even strokes is the best way to keep your finish smooth and bubble-free.
Is Maybelline gel nail polish easy to remove?
Yes, it's very easy to remove compared to traditional salon gels that require filing. You don't need to soak your nails for twenty minutes or use a drill. A standard acetone-based nail polish remover on a cotton pad will do the trick. Simply hold the pad on the nail for a few seconds to break down the polymers, then wipe it away. It's a fast, damage-free process for your natural nails.
Why is my Maybelline nail polish taking so long to dry?
If your polish isn't drying quickly, your layers are likely too thick. Thick applications prevent the solvents from evaporating efficiently. High humidity in your room can also slow down the process. For the best experience, paint in a cool, dry area and stick to the thin-to-thick layering method. This ensures each coat sets properly before the next one is added, leading to a much faster overall drying time.