How to Apply Winged Eyeliner for Beginners: A Step-by-Step Guide to the Perfect Flick
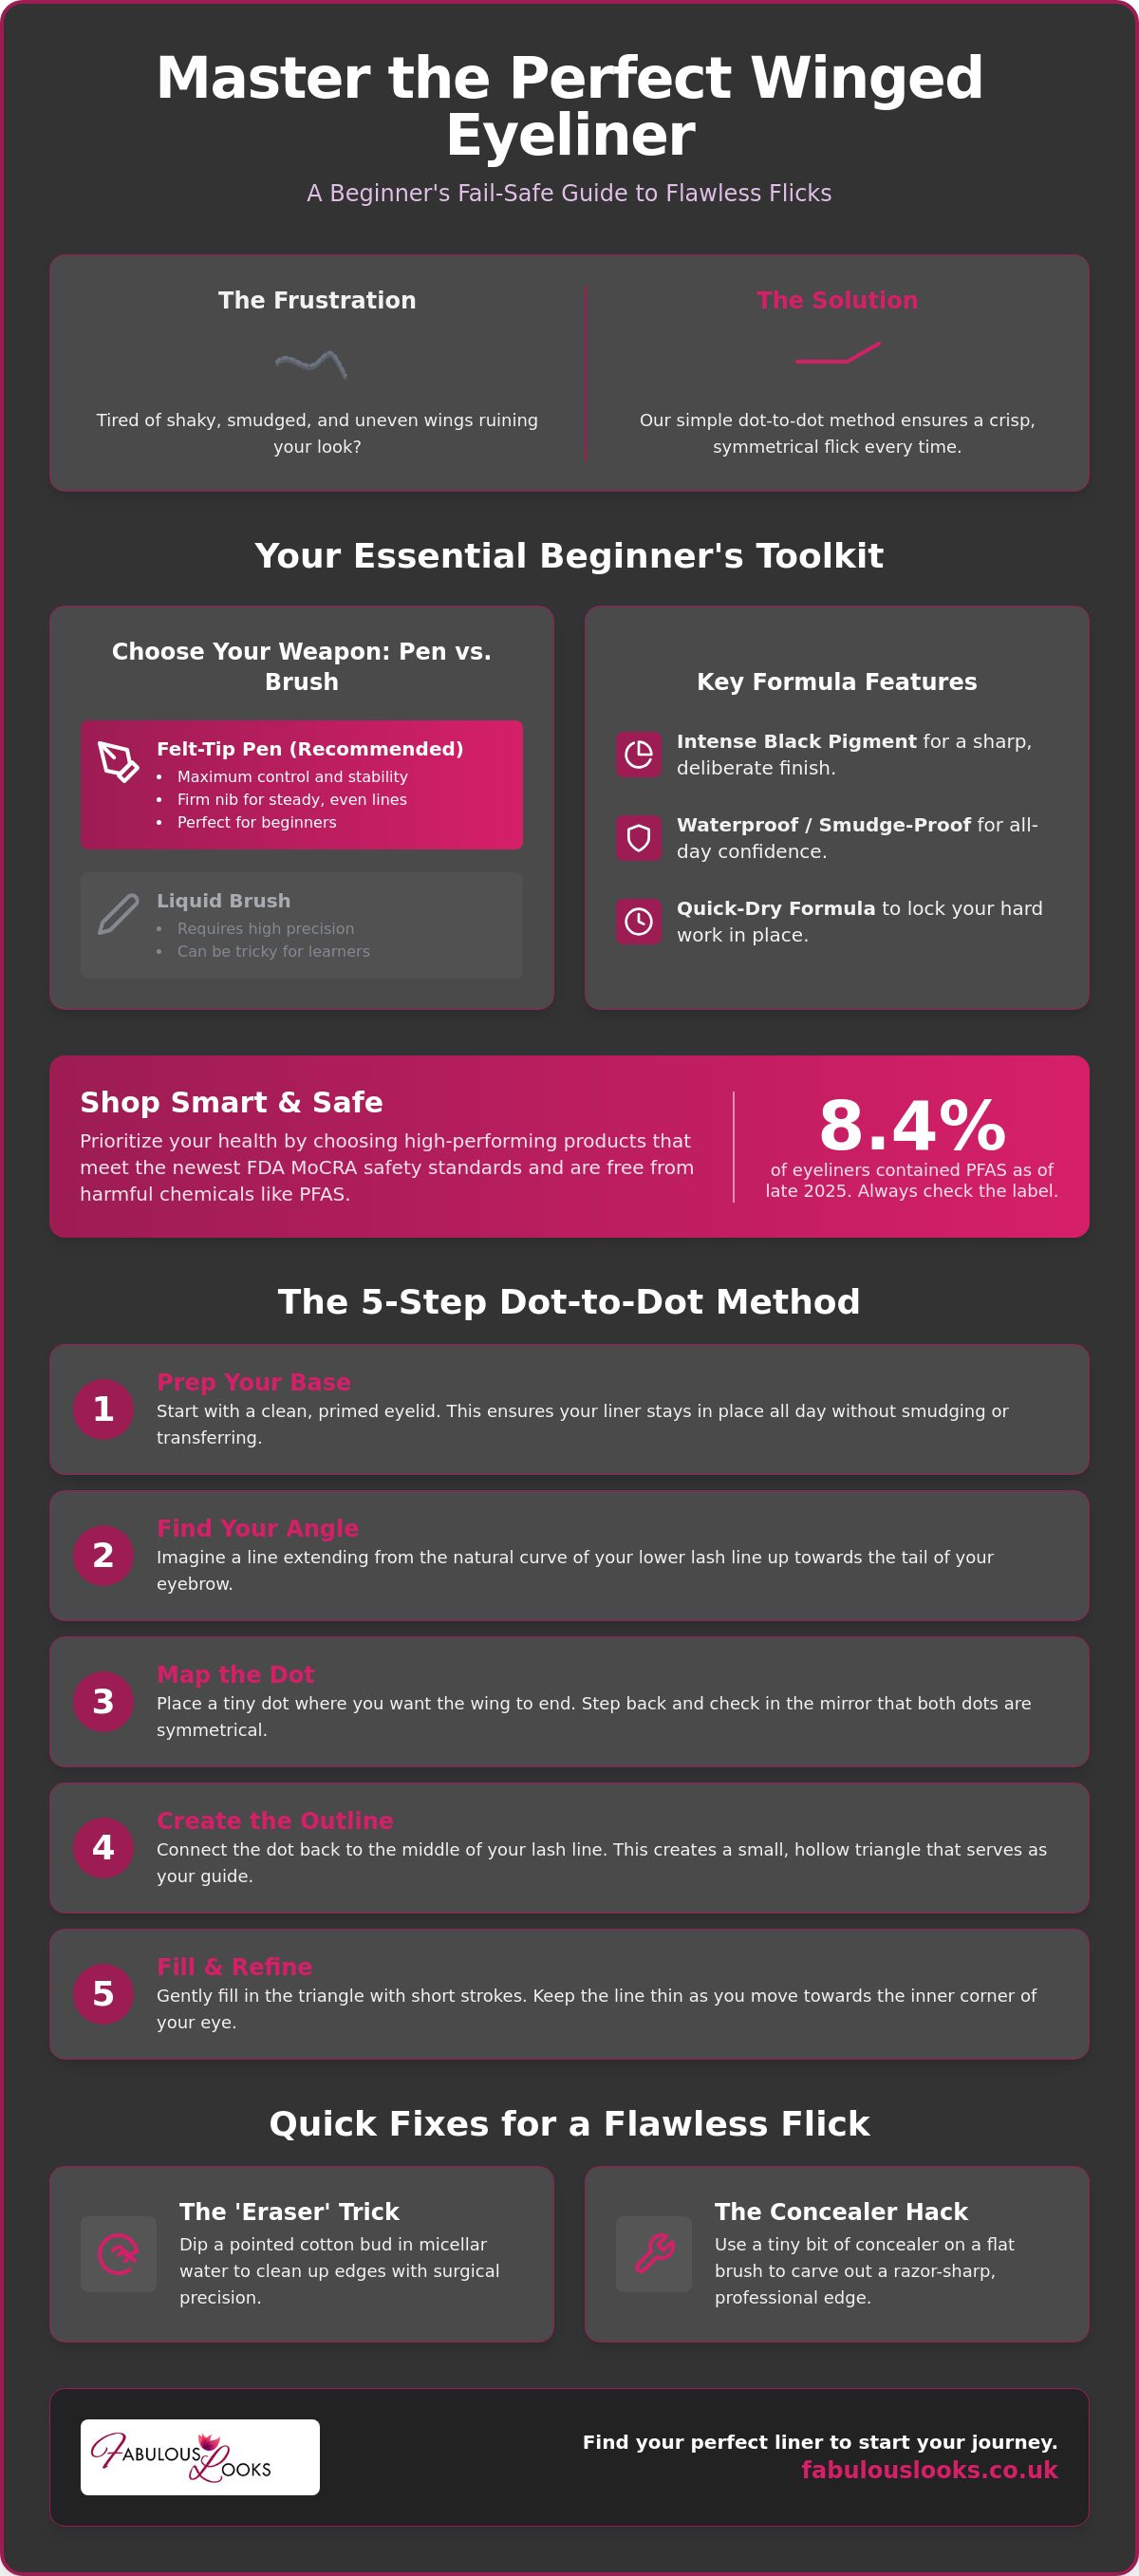
What if the secret to a razor-sharp wing isn't a steady hand, but a simple dot-to-dot trick? We have all been there; one eye looks like a masterpiece while the other is a smudge-filled disaster that forces you to restart your entire face. It's frustrating when shaky lines and uneven wings keep you from the look you want. Learning how to apply winged eyeliner for beginners doesn't have to be a struggle. You do not need a high-end price tag or a professional's steady grip to achieve accessible glamour every day.
Our guide promises a crisp, symmetrical flick every single time using fail-safe techniques and high-street beauty secrets that actually work. We will show you how to use beginner-friendly tools like the Maybelline Master Precise All Day Liquid Eyeliner to create a bold, sharp finish. You will learn the exact placement for your guide dots and get the lowdown on the latest 2026 safety standards. With 8.4% of eyeliners still containing PFAS as of late 2025, we help you pick savvy, high-performing products that meet the newest FDA MoCRA regulations. Get ready to master the perfect flick with total confidence and retail-savvy style.
Key Takeaways
- Pick the right tools; felt-tip liquid liners offer the maximum control and precision needed for a sharp, retail-ready finish.
- Master how to apply winged eyeliner for beginners using our mapping phase to plot your flick with dots before you commit to a solid line.
- Lock in your look by prepping lids properly, ensuring your liner stays crisp and smudge-free from morning to night.
- Fix errors fast with the micellar water eraser trick, sharpening your wings into symmetrical sisters in seconds without restarting.
The Beginner's Kit: Choosing the Best Eyeliner for Your Wing
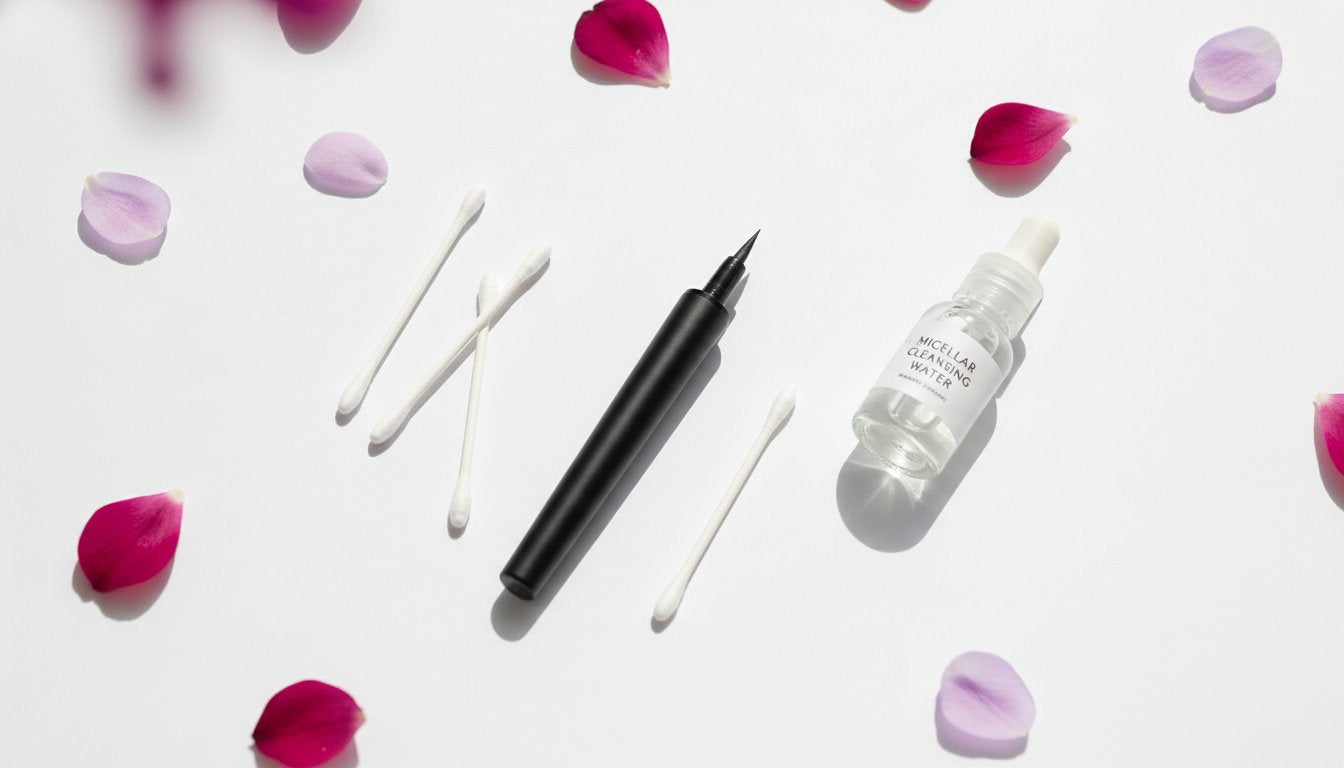
You cannot build a house without a solid foundation, and you certainly cannot nail a flick without the right pen. Before you dive into how to apply winged eyeliner for beginners, you need to understand your kit. There are several different types of eyeliner available, ranging from traditional kohl pencils to professional gel pots. For those just starting out, the felt-tip liquid pen is the undisputed gold standard. It offers the grip of a marker with the high-impact pigment of a professional ink. Always look for "Intense Black" labels. This ensures your wing looks sharp and deliberate, rather than faded or grey by the end of the day.
Formula matters just as much as the applicator. Always check for smudge-proof or waterproof claims on the packaging. This prevents the dreaded "panda eye" effect from occurring by midday. A high-quality, quick-dry formula locks your hard work in place, giving you the confidence to go about your day without checking the mirror every hour.
Felt-Tip Pens vs. Liquid Brushes
Felt-tip pens provide the ultimate stability for your hand. Think of them as high-performance markers for your face. They are perfect for beginners because the nib is firm and does not bend unexpectedly. Liquid brushes, on the other hand, feature a soft, dip-in applicator. While these allow for incredibly thin, artistic lines, they require a level of precision that can be frustrating when you are still learning the ropes. Stick to the felt-tip for a stress-free experience.
Top Affordable Brands to Trust
You don't need to spend a fortune to get a professional finish. Savvy shoppers look to industry leaders like Maybelline and Revlon for consistent quality and high pigment. These brands offer performance that rivals luxury boutique labels at a fraction of the cost. Explore the Fabulous Looks Eye Collection to find authentic, budget-friendly liners that make mastering how to apply winged eyeliner for beginners a breeze. From waterproof formulas to deep matte finishes, the right choice is just a click away.
Step-by-Step: How to Apply Winged Eyeliner Without the Stress
Achieving a symmetrical flick starts long before you touch your pen to your skin. Start with a clean, primed lid, and to ensure your eye area is the perfect canvas for precision, you can learn more about science-backed skincare devices that firm and rejuvenate. This simple step ensures your liner stays in place all day without transferring to your crease. If you're learning how to apply winged eyeliner for beginners, the biggest mistake is trying to draw a long line in one go. Forget the "single motion" advice you might see elsewhere. It's nearly impossible for most people. Instead, use a segmented approach to build your shape piece by piece.
Angle is everything. To find the perfect trajectory, follow the natural curve of your lower lash line. Imagine it extending upwards towards the tail of your brow. This technique helps create winged eyeliner for every eye shape, ensuring the lift looks natural rather than forced.
The Dot-to-Dot Method for Perfect Symmetry
Place a tiny dot at the outer corner of each eye. This marks the exact end of your wing. Step back and check for symmetry in the mirror before you commit. If they look like sisters, you're ready. Connect that dot back to the middle of your lash line. This creates a small, hollow triangle. It serves as your roadmap, taking the guesswork out of the process.
Filling and Refining the Shape
Gently fill in the triangle you just mapped out. Use short, feathery strokes to build the intensity. Keep the line as close to the lashes as possible as you move towards the inner corner of your eye. This creates a seamless transition from the wing to the rest of your liner. If you need the right tools to start your mapping journey, you can explore professional-grade liners that offer the precision you need. With a bit of patience and the right products, mastering how to apply winged eyeliner for beginners becomes a fun part of your routine rather than a chore.
Fixing Mistakes and Mastering the Flick
Don't panic if your flick goes rogue. It's a common hurdle when learning how to apply winged eyeliner for beginners. Most mistakes don't require a full makeup reset. If your line is a bit shaky or too thick, use the 'Eraser' Trick. Dip a pointed cotton bud in micellar water to clean up the edges with surgical precision. For more detailed troubleshooting, check out a step-by-step guide to winged eyeliner which covers various recovery techniques. Another pro hack involves using a tiny bit of concealer on a flat brush. Swipe it right under the wing to carve out a razor-sharp, professional edge. Complete your aesthetic with a high-impact finish. Pair your wing with L'Oreal Paris Lash Paradise mascara to add intense volume that frames your new flick perfectly.
What to Do When Wings Aren't Symmetrical
It's tempting to keep adding liner to the "smaller" eye to match the other. Stop right there. This usually leads to heavy "raccoon eyes" that look messy and overdone. If one wing is thicker, use a dry cotton bud to gently buff away the excess pigment before it fully dries. This is a much safer way to achieve symmetry when learning how to apply winged eyeliner for beginners. The goal is to refine the existing shape rather than building a thicker one. Aim for precision, not just size. Remember, they are sisters, but with these tips, they can finally look like twins.
Long-Lasting Wear for UK Weather
British rain and humidity are the natural enemies of a perfect flick. You want your look to stay crisp from your morning commute to evening drinks. To ensure your liner doesn't budge, set it with a matching black eyeshadow using a small angled brush. This locks the pigment in place and creates a deep, velvety matte finish. Using high-quality, authentic products is non-negotiable for longevity. Check our Branded Makeup UK guide to ensure you're using genuine high-street leaders that perform under pressure. Authentic formulas provide the reliable staying power you need for a busy lifestyle.
Ready to Nail Your Signature Flick?
You now have the full toolkit to transform your makeup routine from stressful to seamless. The secret to success lies in the tools you choose and the patience you apply during the mapping phase. By using the dot-to-dot method, you take the guesswork out of symmetry and ensure a crisp finish every time. Learning how to apply winged eyeliner for beginners is a journey of practice; it is not a one-time test of a steady hand. For those who enjoy the artistry of makeup and want to take their skills even further, a Face Painting Course Online can provide professional training in more complex designs. Don't let a small smudge ruin your look when a quick micellar water fix or a dab of concealer can sharpen your edge in seconds.
To get the best results, you need high-performance formulas you can trust. We provide 100% genuine products from industry leaders like L'Oréal, Maybelline, and Revlon. Everything in our shop is directly sourced from authentic suppliers to guarantee the quality you deserve. We also offer affordable UK shipping on all your beauty essentials to keep your routine budget-friendly. Shop Authentic High-Street Eyeliners at Fabulous Looks today and start experimenting with total confidence. Accessible glamour is just a flick away. Grab your pen and let your creativity take flight.
Your Winged Eyeliner Questions Answered
How do I apply winged eyeliner if I have hooded eyes?
The "batwing" technique is the best way to handle hooded eyes. Keep your eyes open and look directly into the mirror while drawing the initial flick. This ensures the wing doesn't disappear into the fold of your lid. It creates a small step in the line that looks perfectly straight when your eyes are open, giving you a sharp, lifted look without the struggle.
What is the easiest eyeliner for a beginner to use?
A felt-tip pen is the easiest tool for a beginner. It feels like a marker, giving you maximum grip and stability. This is the ultimate choice for anyone figuring out how to apply winged eyeliner for beginners because it avoids the mess of dip-pots. You get a consistent flow of ink with every stroke, which is essential for a clean, professional finish.
How can I stop my eyeliner from smudging on my upper lid?
To stop smudging, you must prep your lids with a matte primer or translucent powder. This absorbs the oils that cause liner to transfer to your upper lid. It's a savvy trick for mastering how to apply winged eyeliner for beginners, ensuring your flick stays sharp and retail-fresh all day long regardless of the weather.
Can I use tape to get a straight eyeliner line?
Using tape is a fantastic hack for achieving a razor-sharp line. Place a small piece of scotch tape along the outer corner of your eye, following the angle of your lower lash line. Use it as a guide for your pen, then peel it away to reveal a perfectly straight edge. Just tap the tape on your hand first to reduce the stickiness before applying it to your face.